Short Guide / Tips – Autofill on Android
(Notice: All mentioned paths, screenshots etc. are based on the current BW Android app 2025.8.1 and stem from Android 15. The paths and optics etc. may change in the future, with updates, and may also be different for older Android versions.)
 (Possible) Current Limitations, bugs and recommendations
(I try to update this list from time to time – but I neither can guarantee that it is “current” nor “comprehensive” at all times)
-
Especially if autofill sometimes works for you and sometimes it doesn’t work (for the same service): There is a current bug with Chrome/Brave/Chromium. – On Chrome 141 or Brave you can enable the following flag: #autofill-update-context-for-web-contents (chrome://flags, brave://flags). Eventually only browser updates will fix this bug.
- Update: it seems that this flag will be enabled by default with Chrome 144, and Brave on Chromium 144, coming later this month (Jan 2026), so this bug will be fixed soon with those coming browser updates.
-
If you previously changed any other browser autofill feature flags (chrome://flags, brave://flags…) – an older recommendation/necessity from 2023/2024 – you may need to reset them now to the default flag settings to prevent autofill from breaking with the new Chrome autofill framework.
- … unless, of course, you have a special use case for some current flags…
-
Passkeys and Bitwarden on Android:
To use passkeys with Bitwarden on Android (i.e. with Bitwarden as your third-party passkey provider on your phone), you need at least Android 14 or above. And in some cases, even Android 14 doesn’t provide it. (see here: Android - passkeys.dev)-
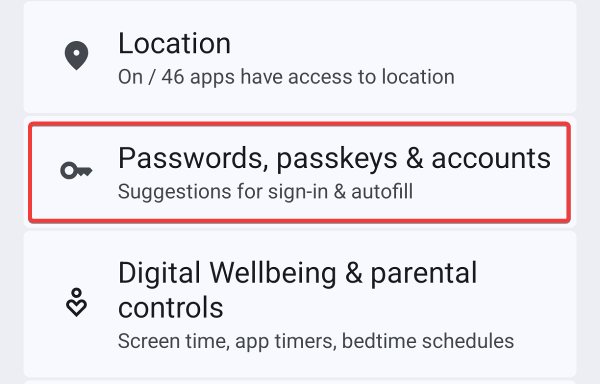
How to check that? → When you enter the Android Settings on your device and don’t see the menu entry “Passwords, passkeys & accounts” but only “Passwords & accounts”, then your device is not ready for using the Bitwarden mobile app as a third-party passkey provider.
-
Passkeys might not be working on Opera (–> Passkeys not working with latest Bitwarden and Android - #12 by andersaberg)
-
Firefox and Edge might not provide all passkey functionality (–> see the “Android” column here: Device Support - passkeys.dev)
-
Overall, due to the new browser (autofill) integrations, passkeys might work best on Brave and Chrome.
-
-
If you’re using Edge, Opera or Samsung Internet as a browser, be aware of this regarding autofill (source: Autofill From Android App | Bitwarden):
-
“Custom fields and split login workflows (when username and password fields are displayed on separate screens) are not currently supported in mobile autofill.” (source: Autofill From Android App | Bitwarden)
-
Match detection on Android seems to be limited to “Base domain” and “Host” at the moment (meaning, “Starts with” and “Exact”… don’t work right now) → see this note: “Due to limitations in what the Android APIs can provide the autofill service, Android Password Manager clients cannot currently match URIs based on port or path.” from the Help Sites and this comment from a Bitwarden employee
-
Due to the way Chrome, Brave and Vivaldi Android apps function, autofill will not work on sites using HTTP unless a browser flag is manually turned on. To enable autofill for HTTP sites on Chrome/Brave/Vivaldi:
-
navigate to
chrome://flagsand/orbrave://flagsand/orvivaldi://flags -
seach for Insecure origins treated as secure and enable that flag
-
add required HTTP domains/IPs, for example:
http://192.0.2.0/24, orhttp://myserver.local -
relaunch Chrome / Brave / Vivaldi
- source: Autofill From Android App | Bitwarden – and see also this GitHub issue, including the comments: [PM-24260] Brave Android app auto fill not working in http websites · Issue #5609 · bitwarden/android · GitHub (–> autofill on HTTP sites seems to work on other browsers without facilitating these flags mentioned above)
-
-
Card autofill is currently only available on Chrome/Chromium browsers (–> Autofill Cards & Identities | Bitwarden)
-
Changing the font size on your Android device can currently cause autofill issues - changing the font size back and/or restart the device could help. (–> see this corresponding GitHub issue: [PM-26225] Autofill fails when system font is increased · Issue #5949 · bitwarden/android · GitHub)

1. General things
-
on the fields you want to autofill: try it both on the username/email field and password field (the autofill suggestions might in some cases only appear when you are on a password field)
-
Always install the Bitwarden mobile app (or rather any BW app) only from the official sources: https://bitwarden.com/download/#downloads-mobile
-
the BW mobile app currently requires Android 10 or above
-
Using the Bitwarden browser extension on mobile browsers is not supported by Bitwarden.
(–> https://bitwarden.com/help/product-faqs/#q-does-bitwarden-manage-in-browser-browser-extensions-on-android-mobile)
-
-
usually, update to the latest app version (you can check the latest version here https://play.google.com/store/apps/details?id=com.x8bit.bitwarden or here Releases · bitwarden/android · GitHub)
-
Using another (second) dedicated password manager on your device may interfere with Bitwarden’s autofill.

2.1 Make Bitwarden your “preferred service” on Android
You can set that up via Android → Settings:

If you press “change” – choose Bitwarden:

You can also achieve this by clicking on “Passkey management” in the BW mobile app (Settings → Autofill):

2.2 Optional: Enable “Google” (or another service) as an Additional Service:
… only necessary if you want to use “Google” (or another service) as an “additional service” on your device…
Android → Settings → Password, passkeys & accounts:

3. Set up autofill in the Bitwarden mobile app (Settings → Autofill)
3.1 Enable Autofill services

→ If you didn’t make Bitwarden your “preferred service” before, this toggle will also initiate that (again).
3.2 Choose how autofill suggestions should be displayed


-
“Inline” requires Android 11+.
-
“Inline” also requires the Android keyboard to be allowed to show inline suggestions, so check if this is activated in your chosen Android keyboard – because otherwise Bitwarden also isn’t allowed to show any inline autofill suggestions.
-
Ensure the suggestion strip is enabled in your keyboard settings menu. (e.g. for Gboard you can find it here: Android Settings → System → Keyboard → On-screen keyboard → Gboard → Text correction → Show suggestion strip)
-
If BW still doesn’t show inline suggestions, try switching keyboards, reinstall Gboard, or clear keyboard cache (Android Settings → Apps → Gboard → Storage & cache > Clear cache.)
-
-
Additional tip: In some cases, autofill can also be evoked by a long press on a login form field, which may offer “Autofill” in a context menu:

3.3 Enable “Use autofill integration” and/or settings for specific browsers
For Brave, Chrome and Chrome Beta, you have to enable “Use … autofill integration” in the BW mobile app:

… after you enabled it, choose “Autofill using another service” in the next dialog:

→ Don’t forget to click the “Restart Chrome/Brave” button.
For Vivaldi browser, open Vivaldi, go to Settings → Autofill services and enable “Autofill using another service” there. Finalize this by allowing Vivaldi to restart.
(this seems to work – for now?! – without enabling “Use autofill integration” for Vivaldi in the BW mobile app, which not even is there as an option at the moment…)
UPDATE: As of Android app 2026.2.1, the “autofill integration” can be enabled via the the BW app itself (Settings → Autofill), like it worked for Chrome and Brave before (also see above):

![]() If you’re using Edge, Opera or Samsung Internet as a browser, be aware of this regarding autofill (source: Autofill From Android App | Bitwarden):
If you’re using Edge, Opera or Samsung Internet as a browser, be aware of this regarding autofill (source: Autofill From Android App | Bitwarden):
3.4 If you want to use the Autofill Quick-Action Tile - or if needed otherwise - activate “Use accessibility”

(–> when you enable it: just follow the dialogue)
The Autofill Quick-Action Tile may be able to autofill when the other mechanisms can’t:

![]() Usually, the above steps should be sufficient to “activate BW autofill” and it shouldn’t be necessary to deactivate the browsers in-built autofill/password managers separately (and the “autofill integrations” for Chrome and Brave deactivates the browser’s autofill). – But if you see, that autofill from the mobile browsers interferes, then try to deactivate it.
Usually, the above steps should be sufficient to “activate BW autofill” and it shouldn’t be necessary to deactivate the browsers in-built autofill/password managers separately (and the “autofill integrations” for Chrome and Brave deactivates the browser’s autofill). – But if you see, that autofill from the mobile browsers interferes, then try to deactivate it.
4. Make sure the URI you want to autofill on is stored in your corresponding login item
-
a login item can have several URIs – and every URI can have an individual match detection setting, different from the default match detection (the latter can be set in Settings → Autofill → Additional options → Default URI match detection) – here two examples, where that might be relevant:
-
login forms are often on a domain, that is different from the main domain of a site – so, e.g. if you only have
https://www.main-domain.comwith match detection “Base domain”, autofill won’t work if the login form is on (example)https://login.second-domain.com→ if that’s the case, then addhttps://login.second-domain.comas another URI to your corresponding login item -
If you e.g. use “Host” as match detection (as default or for an individual URI) for
https://www.main-domain.com, then autofill won’t work even on (example)https://login.main-domain.com→ either addhttps://login.main-domain.comas another URI to your corresponding login item - or you could also change the match detection forhttps://www.main-domain.comto “Base domain” if you wanted to (as it then also covershttps://login.main-domain.comfor autofill) -
(or other similar situations, where the URI that is needed for autofill is missing)
-
-
see also here: Forming URIs for Autofill | Bitwarden
Just as an example of how it could look like in your login item (individual match detection settings for each URI not visible):

5. Autofill and Android apps
-
For autofill in Android apps, the corresponding URI for that app is needed in your login item – the URI has the following form:
androidapp://com...and here the info about how you can obtain the “package name” for an Android app: Forming URIs for Autofill | Bitwarden -
Another possibility to get the
androidapp://com...-URI into your login item would be using “Fill and Save”:-
Without the URI in your login item, just try to autofill in the Android app.
-
BW will open (just like everytime you use autofill), but it will show “no items” for autofill.
-
You can now either create a new login item - or click on the search
 symbol on the top right corner and search for your corresponding login item.
 -
When you chose a login item via the search, a dialogue will open → chose “Fill and save”.
-
By that, it will (auto)fill the credentials of that login items in the Android app and the
androidapp://com...-package-URI for that Android app will be added to your login item, so that next time, autofill should work directly for that Android app.
-
6. Other useful guides / Official Bitwarden Help Sites:
-
Autofill on Android: Autofill From Android App | Bitwarden
-
“Autofill from Android app” (short videos in the “Courses” section of the Help Sites): https://bitwarden.com/help/courses/password-manager-personal/#autofill-from-android-app
-
Troubleshooting Autofill on Android: Troubleshoot Android Autofill | Bitwarden
-
Passkeys on Android: Autofill Passkeys | Bitwarden
- General info about Passkeys and Bitwarden on Android: To use passkeys with Bitwarden on Android (i.e. with Bitwarden as your third-party passkey provider on your phone), you need at least Android 14 or above. And in some cases, even Android 14 doesn’t provide it. (see here: Android - passkeys.dev)
- General info about Passkeys and Bitwarden on Android:
-
Card Autofill on Android: Autofill Cards & Identities | Bitwarden
7. If it still doesn’t work:
-
You may need to disable/reenable autofill settings in the BW app and in the Android system autofill setting
-
you may try to reinstall the BW app
-
alternatively to a reinstall, it could also be enough to just wipe the data of the BW app (Android Settings → Apps → Bitwarden (password manager) → Storage & cache → Clear storage)
-
regardless of whether you reinstall or wipe data: make sure, you can login again, i.e. you have your master password and either have your 2FA at hand or can access your emails for the email verification code if “New Device Login Protection” is active
-
-
restart your mobile browser
-
if it still doesn’t work, you should also try to restart your device in between
8. When everything is set up correctly and it still doesn’t work on a specific site:
- Use this form to report autofill issues with a specific site: Report mobile autofill failure
9. Further troubleshooting:
-
Please temporarily enable flight recorder, attempt autofill actions, and share with the Bitwarden support team:
-
Lastly, if you think you’re experiencing a (general) bug around autofill on Android, then report this bug on GitHub: GitHub · Where software is built (“New issue”) → but again, if it’s only a specific site that doesn’t allow autofill, report this rather via this form: Report mobile autofill failure


10. Beyond autofill…
-
On your Android phone… in Settings → Apps → Bitwarden …
-
in “App battery usage”, enable “Allow background usage”
- depending on your Android version this may also be located in the general “battery” settings – and depend on your general battery settings – and may also be called “disable battery optimization” for the Bitwarden app or something like that
-
in “Mobile data usage”, allow “Background data”
-
if available, disable “Manage app if unused”
-
set the permissions for Camera (e.g. when you want to scan TOTP QR codes) and Notifications (e.g. to get the notifications when you want to use “Login with device” on another device)
-