I’ve been reading various articles and posts on the forum about exporting (backing up) the vault, and I’ve come up with a plan. Being new to this stuff, I’d like to know if my plan makes sense, or entails any risk.
I want to be extra cautious, so this is what I am thinking. Please let me know if this makes sense:
On a regular basis, I will export an encrypted .json file to a USB thumb drive, which I will keep in a secure but easily accessible location locally. (Not sure if each file overlays the previous file, or if it simply writes another file, but in either case, the thumb drive has plenty of room for multiple files, so that shouldn’t be an issue.) Because it’s encrypted, even if someone gets ahold of it, or I forget where it is, it doesn’t have any use without my PW.
I’ll also export an unencrypted .json file to another USB thumb drive, but not as often. That USB drive will be kept at a secure offsite location. The reason for the unencrypted file is that if my PW or vault gets mucked up and I have to start completely from scratch, I’ll have a usable vault to import.
Maybe a bit of overkill on my part, but does it at least make some sense? Or am I missing something?
Thanks
Yes, it makes sense, with the following alternative: Encrypt the second, remote, USB with a pass phrase. Write that down on a sheet of paper and stick it in your drawer. That way, the paper and USB have to be stolen from two different places and matched up before you are under threat.
The export filename contains a datestamp in it. You are correct, exports are small compared to the size of the USB drive, so keeping a bunch allows one to look back in time if needed.
You might consider using a veracrypt encrypted volume and storing unencrypted JSONs in it for both drive, making regular updates to the on-site thumb drive and periodically swapping it with the offsite drives. This way, it takes only one trip to the offsite location to effect an update.
Also, be sure to add your veracrypt (or encrypted backup) credentials onto your emergency kit.
OK, thanks all, good information. I submitted a related question as a new post earlier tonight, but since it follows logically from this discussion, I’ll briefly ask it here:
I read on another forum that creating an unencrypted vault export creates a temporary copy of your unencrypted vault on your device (even if you use the “Save As” option to specify that the file should be saved “directly” to your external USB drive, or to some encrypted container). And that even though the temporary file is deleted at the end of the export process, it may be possible to use file recovery tools, forensic tools, or malware to recover some or all of your vault contents from the device at a later date.
What are you thoughts on this? Any truth to the above statements, or is this more theory than reality?
You don’t need an unencrypted export for this. You can create an encrypted password-protected export, which can be imported into a new Bitwarden account, or decrypted off-line using third-party tools. This is the process:
Click on Tools > Export Vault in the left-hand navigation menu.
In the dropdown menu under File Format, select the option .json (Encrypted).
You will now see two options for Export Type: select Password-Protected (it is very important that you don’t select Account-Restricted).
Choose a strong password for the backup (e.g. a randomly generated passphrase), and enter it into the input fields File password and Confirm file password. Write down this password in a safe location (outside your Bitwarden vault), so that you don’t lose it!
Click Confirm Format.
When prompted (in a window titled Confirm Vault Export), enter the Bitwarden Master Password (not your backup password).
Click Export Vault button. You should see a green alert box in the upper right corner of your browser window, with the message “Vault data exported.”
Go to your Downloads folder, and look for a file named something like bitwarden_encrypted_export_20230612204532.json. Move this file to any location where you will be able to access it later (e.g., a USB drive). The file is encrypted, so you do not have to worry about hiding the file.
This is true, at least on Windows systems. Whether you should worry about it depends on whether your computer has a spinning-platter hard disk drive or a solid state drive (SSD), and if an SSD, whether you have confidence in the security of TRIM operations.
Thanks grb, let me follow up a bit on a couple things you said:
I have a SSD. So, it sounds like there could be a possibility of a security compromise if I create an unencrypted backup file. And in fact, the quote I provided did have this additional sentence that I had left out: “If your device uses an SSD for persistent storage, it may not be possible to fully expunge all traces of a deleted file from the drive.”
So it sounds like you agree with that statement, and that creating an unencrypted vault backup has some element of risk.
So, I would prefer not to create an unencrypted file, for that reason.
With that in mind … If I follow your 9-step process above, are you saying that this backup file could be used for an existing account or, if I have to start all over, a new account? Just making sure I understand you correctly. If that is the case, there would be no need to create an unencrypted backup file anyway, and the encrypted file would serve double-duty (use on an existing account or a new account).
Once I move the file from my Download folder to the USB drive (step 9), I assume I can delete it from the Downloads folder (and from the resulting trash folder), just to be extra cautious.
Am I understanding you correctly about your process and what it will accomplish?
Thanks
Personally, I would be leary. SSDs use wear-leveling techniques which end up making large number of copies of your data any time that you makes changes to it (modifying, deleting, moving, etc.). Technically, TRIM operations (if enabled) are supposed to clean all this up, and some users do have faith that this is the case. Personally, I’m not putting my trust in this technology until it has been proven through peer-reviewed forensic analysis by independent researchers.
HDDs have other issues, but at least there are proven techniques for secure erasure of data from such storage media.
If (and only if) you select the “Password Protected” export type in Step 4, then yes, you will be able to import the resulting .json file into a new Bitwarden account (or into your existing account, if you wish) — provided that you know the file password (from Step 5). You will also have the option to use third-party tools for decrypting the .json file without needing a Bitwarden account at all.
Excellent, thanks.
One more thing I thought of, being the paranoid sort that I am about cybersecurity: Is there any significant element of risk in downloading the encrypted backup file into my Downloads folder, even if I delete it after moving/copying it to the USB file? In other words, does any “trace” (my term) remain of the file such that someone could find it after I move it to the USB. I realize it’s encrypted, but just curious about this.
Putting it another way, is there a way to move the backup file that I create with your process directly from BW to my USB drive, without first putting it into my Downloads folder? Or do I have to put it into my PC’s Downloads folder as an intermediate step?
As you can tell, I’m not a computer expert, which is why I am asking. Thanks again.
If your export file is encrypted and if you have a sufficiently strong file password, then it won’t matter if traces are left behind.
Nonetheless, if you want to save to file directly to the USB, then you will have to first insert the USB, then open your browser settings (e.g., by going to chrome://settings/downloads on a Chrome browser, or edge://settings/downloads on an Edge browser, or about:preferences on a FireFox browser) and modify the location of the default Downloads folder, so that by default, downloaded files are saved on your USB drive.
After you have downloaded the Bitwarden vault export (but before removing the USB drive), you would need to go back to the browser settings to restore the location of the default Downloads folder to its original location.
To facilitate the above procedure, it may be helpful to define a dedicated browser profile, and modify the Downloads folder location only for that profile. Then you only need to switch profiles to do the download, instead of making changes to the browser configuration each time.
grb - Just circling back, I got some USB drives yesterday and followed your suggested 9-step process above. It worked perfectly. I changed Chrome settings temporarily to download the file directly to my USB drive, to bypass anything getting onto my PC. (An added security step, in my mind. Maybe overkill, but it made me feel better) I downloaded both an unencrypted and encrypted file, just in case. (This drive will be kept in a very secure location, so I wasn’t too concerned about having an unencrypted file on it.)
When I was done, I changed the download settings back to where they originally were.
Thanks again
It’s not overkill if you are downloading an unencrypted export, IMO.
If you want to simplify this process for the future (as you should be making vault backups on a regular basis — the more frequently, the better), you can take the following steps for convenience:
Set up a new browser profile that is dedicated to backup tasks that involve creating unencrypted exports. For this profile only, permanently redefine the default Downloads folder to match the desired location on your USB drive. That way you don’t have to change the browser settings twice each time you are doing an unencrypted export — just switch the active browser profile.
Create a Bitwarden login item named “Bitwarden Password Protected Export” (or some such), set the value of the “URI 1” field to https://vault.bitwarden.com/#/tools/export, then click the icon to the right of the URI string, and change the selection in the dropdown menu from “Default match detection” to “Exact”. Next, enter the backup file password (passphrase) in the “Password” field, and click “Save”. This will allow you to auto-fill the file password instead of typing it manually each time that you make a new password-protected export. Please note that you can’t rely on this as your only record of the file password — you should also document your export file password on your Emergency Sheet.
OK thanks, good advice. BTW, just one thing I noted in your answer, but maybe I am misunderstanding: I did not manually type the BW-generated password when I was setting up the encrypted export file; I simply pasted it in the two fields (Enter PW and Confirm PW.) I can’t see that it would matter whether I manually typed it or just pasted it. Did I do something wrong, or are you referring to something completely different in your second bullet point? Thanks again.
Putting sensitive information like a password/passphrase in the system clipboard (by copying it) is generally not advisable, because the clipboard is not secure. Any app or process running on your device is able to read the clipboard contents at any time, and many apps have been found to routinely snoop on the clipboard contents. The risks are exacerbated if you have enabled clipboard history functionality (which keeps a record of items that were copied in the past), and especially if you have enabled any functionality that lets your clipboard contents be synchronized between multiple devices.
Ah, I was not aware of that. So I am glad I asked, thanks.
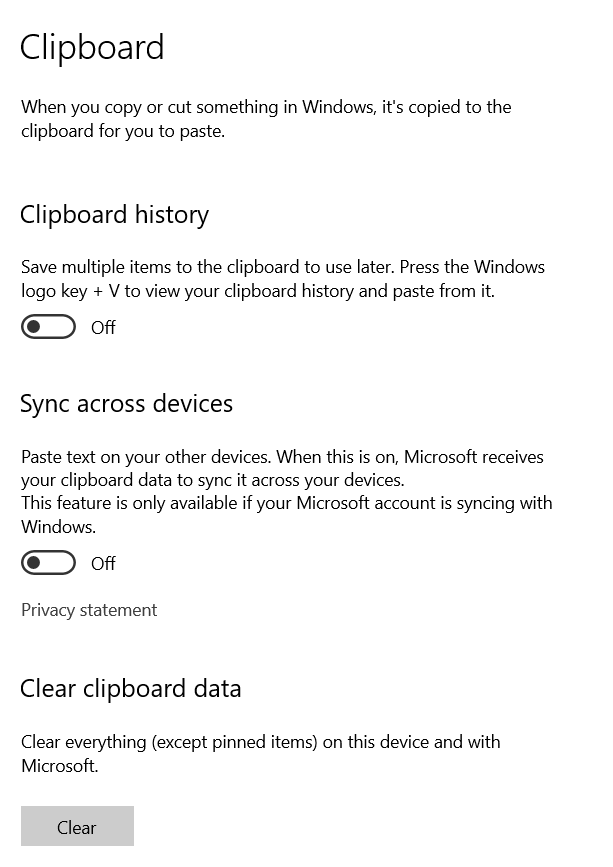
When you say “clipboard,” I assume you mean my Windows 10 clipboard, right? (I couldn’t find one on Chrome.) If that is the case, below are my Windows clipboard settings. When I hit the Windows button + V, a pop-up said “Can’t show history.”
I did not hit the “Clear” button, but I will if you advise.
I also copied and pasted the password into a Word doc and printed it out (but did not save the Word doc.)
In any case, if the PW is left on the clipboard and someone gets it, does it do them any good? Since they don’t have the file itself, and they don’t know what that PW is for.
So, am I probably ok, or do you advise to create another encrypted export file by manually typing in the passwords?
No big deal to do so, if you advise. I’ll simply destroy that USB drive and start over on a new drive, without copying PWs.
Any additional clarification or guidance is appreciated.
Thanks again.
Yes, the clipboard is a feature of the operating system (e.g., Windows). If you have disabled the clipboard history, then it will just contain whatever item was most recently copied.
Whether you consider your copy-paste incident worth worrying about is up to you. You’re right that anybody who may have peeked at your password while it was in the clipboard would also need a copy of the file.
I would suggest that you perhaps consider changing the backup file password the next time that you create a vault backup. And then, to be safe, delete the original backup after the second backup was successfully created.
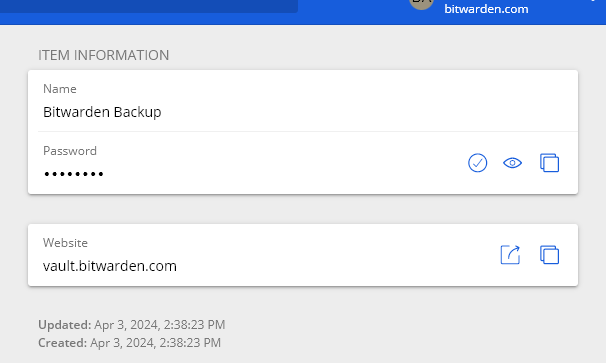
If you need to enter the new file password into a document for printing, then you can open the vault item that contains the password (assuming that you’ve created one, as suggested above), hover your mouse over the Password field name until the mouse cursor changes into a “move/drag” symbol (four perpendicular arrows) as shown in the screenshot below, and then just left-click the mouse and drag that information into the open document (releasing the mouse to transfer the password value).
Thanks. I get the gist of what you are saying, and it makes perfect sense. Sorry, I am missing a few details:
“And then, to be safe, delete the original backup after the second backup was successfully created.” - I thought of that, but if I delete the file from my USB drive, doesn’t it get put into my PC’s recycle bin? And the whole point of my saving the export file directly to the USB drive was to not “touch” my PC with the file.
“you can open the vault item that contains the password” - I am not clear from that screenshot where you are when you do that. Do you mean double-click on the encrypted file that’s on my USB drive, and that screen will appear? (I did so, and the file would not open; it asks what program to use to open it.) Or are you in BW? (I couldn’t find that screen in BW.)
Thanks
First of all, this is an encrypted file that we’re talking about, so the existence of the file in your Recycling Bin is only modestly more risky than keeping it on the USB drive.
Second, by default, files deleted from USB drives are permanently deleted, without going to the Recycling Bin. If you have set up a special configuration to allow files to be recycled from a USB drive, then the Recycling Bin in question will be stored on the USB drive itself, not on your main computer.
Third, to force the permanent deletion of a file (bypassing the Recycling Bin), you can simply use the key combination Shift+Delete.
If you go back to this previous comment, you will see that the second bullet point proved instructions for how to create a vault item that stores your backup file password inside your Bitwarden vault. So if you have not yet created such a login item in your Bitwarden vault, then you should do so first. After you have created the item, you can use the search feature that is provided in all Bitwarden apps, to locate the item that has your export file password — click on the item name in the search results list, and it should open to the item for viewing, as I showed in my screenshot. The screenshot in my prior comment was from the Bitwarden browser extension; if you’re viewing the vault item in the Bitwarden Desktop app instead, it would look like this: