Help me get Yubikey 5Ci working with Bitwarden (as 2FA-"passkey")

I just bought a new Yubikey 5Ci and am having trouble getting it to work with Bitwarden. I am following the instructions on this page:

I navigate to Security → Two-step login → Passkey → Manage

  1. I type in a name for my Yubikey.
  2. I select “Read key”.
  3. At this point a popup appears:
  4. Then I touch the Yubikey and select Save.

When I log out and try to log back in, I enter my password and then this dialog appears:


I enter my PIN and it logs me in.

It is not clear how to use the Yubikey as a FIDO2 Webauthn device.

At the first Windows Security prompt, don’t select “Fingerprint” or “PIN”. Select “Use another device”, which will (hopefully) give you the option to then specify a “Security Key” as the device to use for authentication.

1 Like

Thanks. When I select “User another device” then select “Security Key”, I get this popup:

You have to use the “Security Key” option when you register the passkey as a Bitwarden Two-Step Login method.

I suggest that you delete the 2FA you initially created (with the PIN), and register your Yubikey.

That’s different from what the Bitwarden " Two-step Login via FIDO2 WebAuthn Passkey" instructions say. The key I am using is the Yubikey 5Ci. The Yubikey manager says that it has the FIDO2 interface.

I deleted the passkey entry and set up the key under “Yubico OTP security key”. After I log out and try to log in again I get the same popup stating that “This security key doesn’t look familiar”.

Is it possible that Windows Hello is interfering with the setup of this Yubikey? When I follow the instructions to set up the Yubikey as a two-step login passkey in that Bitwarden article that I linked, these are the steps that I go through:

  1. Give the Yubikey a name.
  2. Click on “Read key”
  3. This dialog pops up:
  4. I can either use my finger print (my laptop has a finger print reader) or enter a PIN.
  5. Then this dialog pops up:
  6. As soon as I click OK on that dialog, next to the “Read key” button it says: “Use the Save button below to activate this security key for two-step login.” It never asked me to touch my Yubikey. Isn’t it supposed to?

You misinterpreted what I wrote. Yes, you can use your Yubikey as a passkey for Bitwarden 2FA.

Based on the symptoms that you have reported, I based my advice off the assumption that in your initial attempt to set this up, you actually selected the “PIN” option in the Windows Security prompt when you were attempting to register your Yubikey as a Bitwarden 2FA passkey (this is the most likely explanation for why you were later prompted for — and were successfully able to authenticate using — your PIN).

Therefore, I recommended (and now recommend again), that you return to the Bitwarden Two-Step Login setup, and delete all passkeys previously registered. I also recommend that you delete the Yubico OTP 2FA that you just enabled.

After you’ve cleaned up the previous mistakes, go back an re-register your Yubikey as a FIDO2/Webauthn passkey in the Bitwarden Two-Step Login setup. When you click Read Key and see the Windows Security prompt, make sure that you click “Use another device” and then select “Security key”. Follow the prompts to register your Yubikey.

In your step-by-step description of what you did, your error is in Step 5 (and everything that follows). When you get to Step 4 (the Windows Security “Making Sure It’s You” prompt), you must click “Use another device” and then select “Security key”.

1 Like

@wcb Please read the following only when you have the nerve for it :sweat_smile::

To explain more what happened here: The steps and screenshots you provided before showed the following: the way you chose fingerprint and/or PIN, you stored the 2FA-“passkey” via Windows Hello/Security, probably on your TPM instead of on the YubiKey.

One of your first screenshots shows, that that’s the way to store it “on your device” (= not on the YubiKey).

That’s why @grb emphasized, when creating the 2FA-passkey, you have to choose “Use another device” → “Security key”. Then, the 2FA-passkey get’s stored on the YubiKey… and then, you can also use it afterwards from the YubiKey. :wink:

1 Like

Sidenote: I added “(as 2FA-“passkey”)” to the title for clarification.

1 Like

Thank you for this detailed explanation. That is what I needed. I was able to successfully register this Yubico key as a 2FA passkey with your help.

I had worked on this for hours last night and it was very frustrating. The Bitwarden instructions that I posted for registering this key are woefully inadequate. They do not mention anything about the multiple Windows Security dialogs that pop up leaving the user to make their best guesses. It is still not entirely clear how to make best use of those Windows Security popups. While I was able to properly register my Yubico key, I can’t help to wonder if any of the other options presented in those popup dialogs would be of any use with Bitwarden.

Thanks again for your help.

Thanks. All of this is still not totally clear to me but it sounds like Windows was intercepting where I wanted to store the 2FA passkey. Is that correct? Should I also be using this or under what conditions should I use it?

Thanks.

You’re welcome, and I’m glad to have been of help.

To be fair, under Step 5 of the setup instructions, it does include the following Note that mentions looking out for options to specify the use of a security key by selecting “another” option:

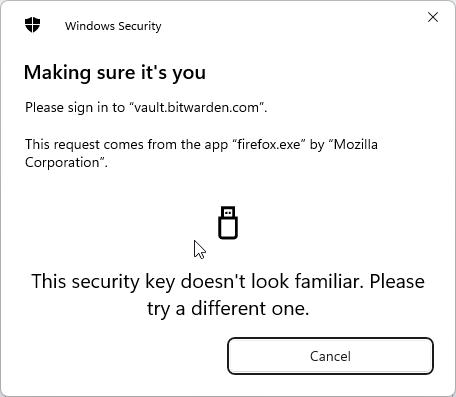
This may not have been clear without the screenshots (especially since the language used in the Windows Security prompt (“Use another device”) is slightly different from the examples that are listed in the Note.

However, you have to remember that Bitwarden can be used on at least 5 different operating systems, and that the detailed steps will differ depending on the operating system. Add to that the fact that operating system updates often result in changes to workflow processes and to the appearance/content of various operating system prompts — thus, there may be several dozen (or more) variations of how the passkey registration process will unfold, depending on what version of a specific operating system is installed.

For these reasons, it is not realistic for the Bitwarden documentation to include a detailed step-by-step description (and screenshots) of the operating system prompts that must be navigated when adding a passkey to Bitwarden.

Yes, Windows detected that Bitwarden wanted to create a passkey, and intercepted that request to ask you where you wanted that passkey to be stored.

Operating systems (including Windows, macOS, Android, and iOS) have the ability to store passkeys on your device. In some cases, the operating system may also allow passkeys stored on one of your devices to be synced to your other devices. To use the passkeys that are stored by an operating system on one of your devices, you typically need to supply a PIN or some kind of biometric input (e.g., a fingerprint).

Some users find passkeys stored on their devices (e.g., on their mobile phone) to be more convenient than passkeys stored on a hardware security key (e.g., a Yubikey). For such users, selecting one of the other options in the Windows Security prompt that appears during passkey registration would makes sense — it would provide a way to use their device as a passkey for 2FA when logging in to their Bitwarden account.

This is what happened in your first attempt. You inadvertently created a 2FA passkey that was stored on your laptop, secured by a PIN. Then, when logging in to your Bitwarden account, you were able to present the stored passkey at the 2FA prompt, simply by entering your PIN (no Yubikey involved).

2 Likes

Yes, I see that. My opinion of the instructions is that they are good for someone who is already knowledgeable about the procedure. However, for someone who is doing this for the first time, it is not enough. Often, instructions are written by someone who is already knowledgeable about the topic. What needs to happen to make those instructions more useful is for someone who does not already know the procedure, to try to follow them. They weren’t enough for me.

Yes, now this is clearer. However, when seeing these prompts for the first time I thought Windows was trying to confirm my identity or something before storing the passkey. It wasn’t obvious that I was selecting where to store the passkey.

Should something like this be set up as an alternate way to get into your Bitwarden account (like if you don’t have your Yubikey with you)?

The disadvantage of doing so is that if your device falls into the wrong hands and you PIN is easy to guess, then they could get access to your Bitwarden vault. Each user needs to find a balance between security and convenience.

At a minimum, if you haven’t already done so, you should obtain a copy of your 2FA reset code and record it on your Emergency Sheet. This will protect you in case you lose access to your Yubikey or it stops working for any reason.