Guide to routing to your Bitwarden Server via nginx reverse proxy
Using a Reverse Proxy
In this guide we will cover how to set up a Self-hosted Bitwarden Server, accessed via an Nginx Reverse Proxy.
A reverse proxy is an application that sits between end-users and the servers and services that they wish to access. There are many reason a user may wish to implement a reverse proxy, which can be read about here:
In particular, many users implement reverse proxies to host multiple services on a single IP address, and so that only a single endpoint is exposed to the internet as a result, allowing for a high level of control on this single endpoint.
General Overview
In this guide we will create the following setup:
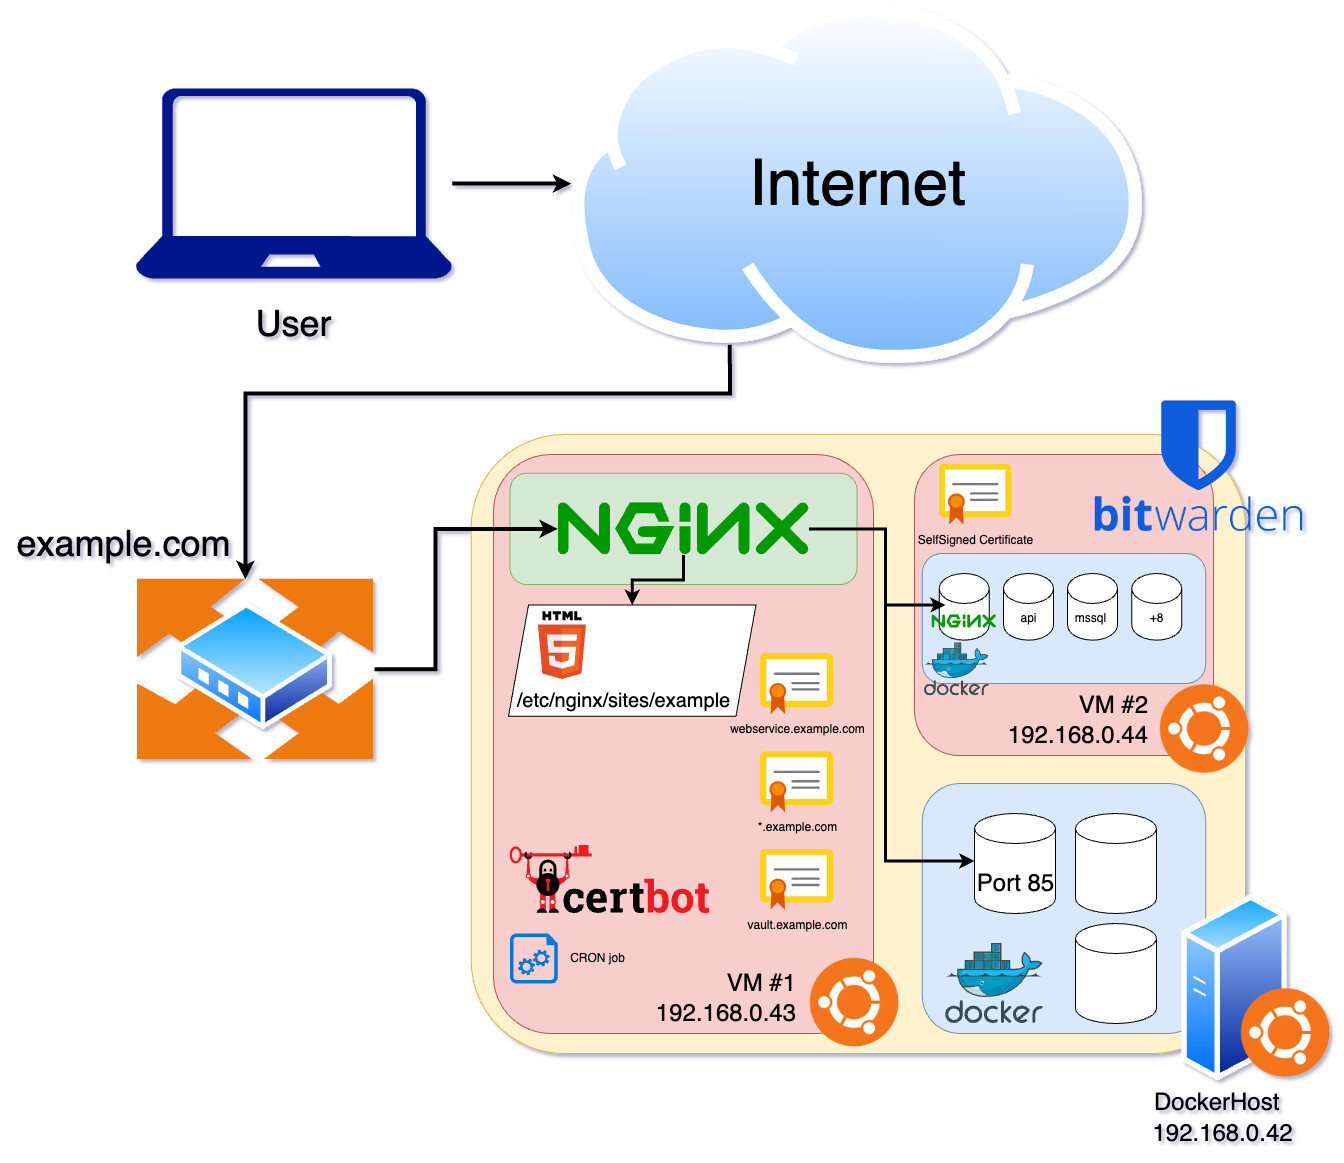
The guide begins with traffic destined for example.com hitting the router, which is configured to forward traffic to ports 80 and 443 of an Nginx reverse proxy. This reverse proxy is hosted on VM#1 (192.168.0.43) on the 192.168.0.0/24 network, installed as a process on the guest OS.
Nginx will forward the traffic depending on the subdomain requested. In the guide and code examples below, 3 different routes are configured:
The wildcard (*) ensures that any traffic NOT attempting to access either vault.example.com or webservice.example.com will be redirected to the static pages being served directly by the Nginx server - e.g., https://example.com, www.example.com and otherservice.example.com will all redirect to these static pages.
VM#2 consists of a standard Bitwarden installation with a self-signed certificate, with the static IP address 192.168.0.44.
Finally, the DockerHost itself (IP 192.168.0.42) is running some containerised services - an example of which is accessible on port 85. VMs #1 and #2, as well as DockerHost, are all running Ubuntu Server, for 3 Ubuntu environments in total.
Certificate Termination Considerations
Bitwarden must be configured to use a TLS certificate. When using Bitwarden in a web-facing configuration, this is terminated at the nginx container on the Bitwarden server itself. The various options available are described in the Help Guide here:
When a reverse proxy server is used, the certificate should instead be terminated at the reverse proxy. Despite this, a self-signed certificate must still be available to Bitwarden, the configuration steps for which are described below.
Certificate Renewal Considerations
With the end-user certificate being handed over to the Nginx reverse proxy on VM#1, the LetsEncrypt renewal services used by the Bitwarden server can no longer be used, and the end-user is now responsible for this action.
While this can be handled in many ways, this guide will demonstrate how to use Certbot with a CRON job to perform this task.
Nginx Server Configuration
First we’ll look at the Nginx Server, which in this example is running on Ubuntu 22.04 LTS.
Static IP configuration
This server will need a static IP on the network in order to receive incoming traffic from the router. This is generally be configured with netplan:
https://ubuntu.com/server/docs/network-configuration
Nginx Installation
There are many ways to configure and install Nginx, including building from source, running inside a container via Docker and via APT. Using the APT package manager is probably the simplest way to do so:
sudo apt install nginx
You can check that the installation was successful by running:
nginx -v
On Ubuntu, nginx should automatically be picked up by Systemd and set to run as a service. Some useful commands to manage Nginx are:
nginx -t
tests your nginx configuration file
nginx -s reload
restarts the nginx server, taking into account any changes made to the configuration file
**Note! **
Nginx is a module program, and the standard installation can be augmented by many other modules augmenting the default capabilities.One module that should be installed in a reverse proxy is the ngx_http_realip_module, which will ensure that the IP addresses presented to the Bitwarden server (e.g. in eventLogs) are those of the end-user, and not the reverse proxy.
The apt package installed in this guide does include this module, but if you are using a different nginx package, e.g. on a different host OS, you should confirm that this is also the case.
Writing the Nginx Configuration File
The default configuration file location is:
/etc/nginx/nginx.conf
Writing a complete nginx configuration is not within the scope of this article, but comprehensive documentation can be found here:
Many applications also come with suggested nginx configurations, which are an excellent starting point to add code-blocks for other proxy-destinations and virtual-hosts.
Sites-available & sites-enabled
The default nginx.conf includes a couple of lines that allows additional configurations to be loaded:
	include /etc/nginx/conf.d/*.conf;
	include /etc/nginx/sites-enabled/*;
It is considered good practise to break down nginx configurations into different files in order to improve readability. As all config files in the /etc/nginx/sites-enabled directory will be considered by nginx, we can make use of this feature to keep our Bitwarden configuration in a distinct vault.example.com.conf file - separate from the other sites or services that we wish to host behind this nginx instance, which can similarly be configured in their own files.
Best practise is actually to place these configuration files in the /etc/nginx/sites-available directory, and then create a symlink from the file to the sites-enabled directory. This allows for two ‘statuses’ of sites to be stored on the same server - sites that are actively being served by nginx, and sites that are ready to be served, but not currently being served.
Using certbot with the nginx plugin
The certbot tool has the ability to not only obtain certificates for your website based on a variety of challenge types, but also to re-write any nginx configurations that it finds to automatically add support for the certs that it obtains.
In order for this to take place, the nginx configuration file must firstly be primed, with the 3 destinations defined in server blocks, after which certbot will be able to make the necessary changes to enable SSL termination. While the ‘priming’ for the additional sites and services used to demonstrate the reverse proxy being a front-end for multiple destinations are outside of the scope of this article, an example initial nginx config, ready for modification by the certbot nginx plugin, can be found below.
Initial nginx configuration
We first need to provide the server blocks for our host servers - these will log the domains in the file so that certbot can identify them and request certificates. Here is an example configuration file that serves three services:
- A Bitwarden server at vault.example.com - available on .44
- A Webserver at *.example.com - available via the Nginx server at .43
- A Webservice at webservice.example.com - available at port 85 on .42
In the below configuration example, each of these services is represented by a server block, containing instructions for how to handle traffic that reaches nginx requesting those services:
nginx.conf
The default configuration can be kept for the nginx.conf file, but check for the presence of the:
include /etc/nginx/sites-enabled/*;
line, which will allow for additional config files to be picked up.
vault.example.com.conf (placed in /etc/nginx/sites-available)
server {
    listen 80;
    server_name vault.example.com;

    # Let's Encrypt challenge location (must come before general location blocks)
    location /.well-known/acme-challenge/ {
        root /var/www/html;
    }

    # Reverse proxy configuration for HTTPS traffic
    set $upstream https://192.168.1.44:443;

    # Proxy headers
    proxy_redirect off;
    proxy_set_header Host $host;
    proxy_set_header X-Real-IP $remote_addr;
    proxy_set_header X-Forwarded-For $proxy_add_x_forwarded_for;
    proxy_set_header X-Forwarded-Proto $scheme;
    proxy_set_header X-Forwarded-Host $host;

    # Client and proxy settings
    client_max_body_size 256m;
    client_body_buffer_size 128k;
    proxy_connect_timeout 90;
    proxy_send_timeout 90;
    proxy_read_timeout 90;
    proxy_buffers 32 4k;

    location / {
        proxy_http_version 1.1;
        proxy_set_header Connection "";
        proxy_pass $upstream;
    }

     location /admin {
       proxy_http_version 1.1;
       proxy_set_header Connection "";
       proxy_pass https://vault.example.com:443/admin;
     }

}
webservice.example.com (placed in /etc/nginx/sites-available)
 server {
   server_name webservice.example.com;

     location / {
       proxy_pass http://192.168.1.42:85;
       proxy_redirect  http://192.168.1.42:85 https://webservice.example.com;
   }
This initial configuration is enough for Certbot to work with.
Set symlinks
Once the config files are ready in /sites-available, symlinks should be added to make them available in /sites-enabled, from where they will be discoverable by the nginx webserver, and also by the certbot nginx plugin! An example of the syntax to do this is:
sudo ln -s /etc/nginx/sites-available/vault.example.com /etc/nginx/sites-enabled/vault.example.com
and this should be done once per config file.
The default config can also be deleted with:
rm /etc/nginx/sites-enabled/default
Every time changes are made, nginx should be reloaded with:
nginx -s reload
Final Considerations
Note the headers and other variables present in the Bitwarden (vault.example.com) Server block, which are used to ensure that the traffic flowing to the Bitwarden server via the nginx reverse proxy is handled correctly.
Note also the presence of a dedicated location block for /admin, which can assist with forwarding connections to the System Administrator Portal.
Install Certbot
Certbot is a free, open source software tool to automatically generate Let’s Encrypt certificates. Their website is located here: https://certbot.eff.org/
Bitwarden sets up Certbot in Docker to generate LetsEncrypt signed certificates as part of the installation script, and regularly calls this tool as part of updates and the ‘renewcert’ shell command. Because in this example the nginx server is not installed on the same machine as the Bitwarden server, we will need to configure Certbot manually on the machine hosting the nginx reverse proxy server.
The simplest and recommended way to install Certbot on Ubuntu is using snap:
sudo snap install --classic certbot
sudo ln -s /snap/bin/certbot /usr/bin/certbot
Use Certbot to generate SSL certificates
Certbot can read and modify our initial nginx configuration, based on the server blocks we’ve already configured:
sudo certbot --nginx
When prompted, ask Certbot to generate a certificate for all domains found. You should find that your nginx configuration has been modified to add ssl certificates configurations to all of the locations previously defined. For this guide, we are interested in the vault.example.com configuration, controlling the proxy-pass onto the Bitwarden server on VM#2
server {
    server_name vault.example.com;

    # Let's Encrypt challenge location (must come before general location blocks)
    location /.well-known/acme-challenge/ {
        root /var/www/html;
    }

    # Reverse proxy configuration for HTTPS traffic
    set $upstream https://192.168.1.44:443;

    # Proxy headers
    proxy_redirect off;
    proxy_set_header Host $host;
    proxy_set_header X-Real-IP $remote_addr;
    proxy_set_header X-Forwarded-For $proxy_add_x_forwarded_for;
    proxy_set_header X-Forwarded-Proto $scheme;
    proxy_set_header X-Forwarded-Host $host;

    # Client and proxy settings
    client_max_body_size 256m;
    client_body_buffer_size 128k;
    proxy_connect_timeout 90;
    proxy_send_timeout 90;
    proxy_read_timeout 90;
    proxy_buffers 32 4k;

    location / {
        proxy_http_version 1.1;
        proxy_set_header Connection "";
        proxy_pass $upstream;
    }

     location /admin {
       proxy_http_version 1.1;
       proxy_set_header Connection "";
       proxy_pass https://vault.example.com:443/admin;
     }

    listen 443 ssl; # managed by Certbot
    ssl_certificate /etc/letsencrypt/live/vault.example.com/fullchain.pem; # managed by Certbot
    ssl_certificate_key /etc/letsencrypt/live/vault.example.com/privkey.pem; # managed by Certbot
    include /etc/letsencrypt/options-ssl-nginx.conf; # managed by Certbot
    ssl_dhparam /etc/letsencrypt/ssl-dhparams.pem; # managed by Certbot

}


server {
    if ($host = vault.example.com) {
        return 301 https://$host$request_uri;
    } # managed by Certbot


    listen 80;
    server_name vault.example.com;
    return 404; # managed by Certbot


}
Bitwarden Certificate Configuration - Using a Self Signed Certificate
Even though Bitwarden is being fronted by the nginx server, which is handling certificate termination, it is best practice to configure Bitwarden to use a self-signed certificate in order to encrypt its internal communications. How you do this will depend on whether you are installing Bitwarden from scratch, or converting an existing Bitwarden server to run behind the proxy.
New Bitwarden Installations
If you have not yet installed your Bitwarden server, the installation scripts will take care of generating and configuring a self-signed certificate for you.
Follow the standard installation guide ( Linux Standard Deployment | Bitwarden ), but when prompted whether to use a LetsEncrypt certificate in step #5, select no, and no again when asked if you have an SSL certificate to use. The installer will then prompt you to generate a self-signed SSL certificate, at which point please select yes to do so.
Post-install configuration
Post-install configuration steps should be completed as normal, including the setup of admin users and an SMTP server:
Finally, start Bitwarden when you have made all the necessary configuration changes:
Configuring an Existing Bitwarden Installation
If you have an existing Bitwarden server, configured with either a LetsEncrypt or CA provided certificate, this will need to be swapped over to a self-signed certificate once the reverse proxy has been put in place.
Generate and configure Self Signed certificate
Generating and configuring Bitwarden to use a Self Signed certificate is documented at the link below:
Once you have performed these steps, you will need to rebuild and then restart your server using the Bitwarden shell script commands.
Note: If you are moving away from using a SelfSigned certificate managed by LetsEncrypt, Bitwarden will still attempt to renew this, even though it is no longer being used by the Bitwarden Server. You can stop this from happening by deleting or renaming the /bwdata/letsencrypt/live directory (e.g. mv live live_bak)
Note: If you are moving away from using a LetsEncrypt certificate, don’t forget to set the ssl_managed_lets_encrypt variable to false in /bwdata/config.yml
Testing
At this stage, assuming that all has gone well, you should be able to access all 3 different routes via a web-browser! You should also be able to configure your Bitwarden clients to access the server as described below:
Automate Certificate Renewals with Certbot
Finally we can use CRON to automatically renew our SSL certificates on the Docker Host, now that Bitwarden can no longer take care of this task for us.
Certbot comes with this functionality already built in - in order to test your renewals you can use the command
sudo certbot renew –dry-run
After checking that no errors are shown in the output, it is convenient to add a cronjob to renew this on a regular basis.
Although the certificates last for a long time, Certbot recommends running the renewal script regularly. If the certificates are not due to be renewed then no action will be taken, while running regularly will help should a Let’sEncrypt initiated revocation take place for any reason.
It is good practise to choose a random minute to on which to run the scripts (i.e., replace 51 with a random number between 0 and 59):
crontab -e
Add the following line to your crontab
# m h  dom mon dow   command
51 6 * * * certbot renew --post-hook "nginx -s reload" >/dev/null 2>&1