Screenshot 1 is the new collection, named “test”, which has no items.
Collection “Default collection” has all financial credentials, however no general credentials.
Collection “Unassigned” has no items.
OK, thank you for at least partially completing the above assignment.
I can see that you have:
Renamed your organization from “Finance” to “Organization”.
Deleted the nested collection “Default Collection/Shared”.
Created a new top-level (non-nested) collection named “test”.
Also, your organization currently has no members other than yourself.
Would you mind completing Step 3 from my previous instructions?
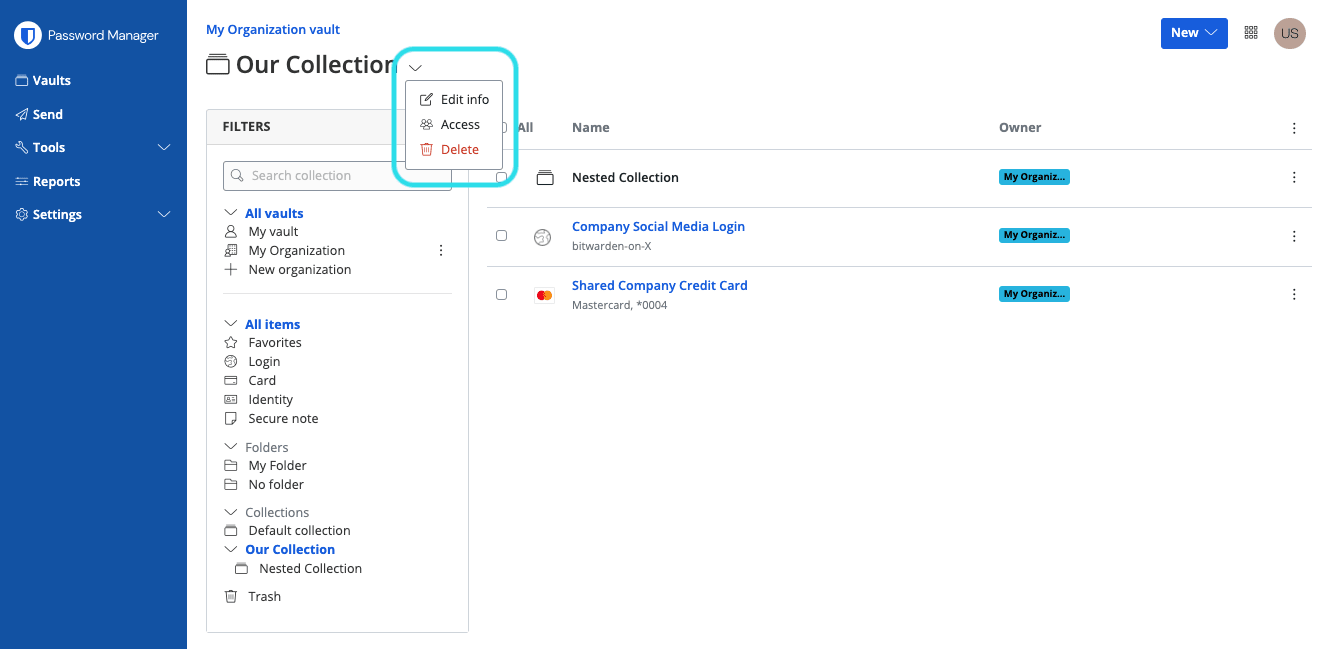
In addition, you should probably delete your “test” collection, although you can do so at a later time, if you prefer. To delete, open the “test” collection while in the Password Manager section of the Web Vault, then click the V arrow icon next to the collection name at the top of the page (as shown in this screenshot), and select Delete.
Once I see that you have correctly created the two required collections “Finance” and “Shared” (please post a new screenshot to show this), then I will provide instructions for how to move your financial credentials into the “Finance” collection and complete the rest of the setup for implementing Option 4.
I deleted Collection named “Test”.
I created a new Collection named “Finance”.
I couldn’t create a 2nd Collection named “Shared”. Bitwarden prompted error: You have reached the maximum number of collections (2) for this organisation.
Here’s the latest screenshot:
My mistake, I should have remembered that only a a maximum of 2 collections can be created for free organizations.
Could you please eitherrename the “test” collection to “Shared”, or delete the “test” collection and then create a new collection named “Shared”?
In addition, before taking the screenshot of the Filters area in the Password Manager section of the Web Vault, please ensure that you have selected “All Vaults”, as you’ve done in previous screenshots.
I deleted the Collection named “Test” and created a new Collection named “Finance”.
I am still unable to create a 2nd Collection named “Shared”, due to Bitwarden prompt error: You have reached the maximum number of collections (2) for this organisation.
Here’s a screenshot with Web browser → Bitwarden (Web Vault) → left column → Password Manager and Vaults → right window → FILTERS → All vaults, selected:
OK, that’s fine. Perhaps the “Default Collection” counts towards the 2-collection maximum. If desired, you could look into whether it is possible to rename the “Default Collection” (to “Shared”).
Regardless, let’s start organizing some of your vault items. Go to the Admin Console in the Web Vault, then use the Filters in the Admin Console to open the “Default Collection” (or “Shared” if you were able to rename it). According to the information you’ve provided previously, this collection currently contains all of your financial account credentials, and you should see a list of these on the right.
Now, click the checkbox labeled “All” (to the left of the column title “Name”), which should put a check mark in front of every item. Having done this, click the kebab icon (three vertical dots) to the right of the column title “Permissions” and select Assign to Collections from the popup menu, as shown in the screenshot below:
You should then be presented with a dropdown menu, where you can choose the collection that you wish to assign the vault items to; choose the “Finance” collection only, and then click Assign.
After you’ve done this, verify that the “Finance” collection now contains all of your financial account credentials, and that the collection named “Default Collection” (or possibly named “Shared”, in case you were able to rename it) is empty.
Check back in, and I will provide additional instructions.
Now Collection “Finance” has all financial credentials.
Collection “Shared” was renamed from Default Collection, using the Collection “Default Collection” kebab (I guess the word “souvlaki” is too long?) icon and selecting Edit info.
Collection “Unassigned” shows as empty. Can this be deleted to keep the place neat, tidy and less confusing/distracting?
The “Unassigned” collection is not really a proper collection, but a “tag” of sorts. It cannot be deleted, but the good news is that as soon as you leave the Web Vault Admin Console (i.e., whenever you are using any of the Bitwarden Password Manager apps or browser extensions), you will never see the “Unassigned” collection, nor any items designated as “Unassigned”.
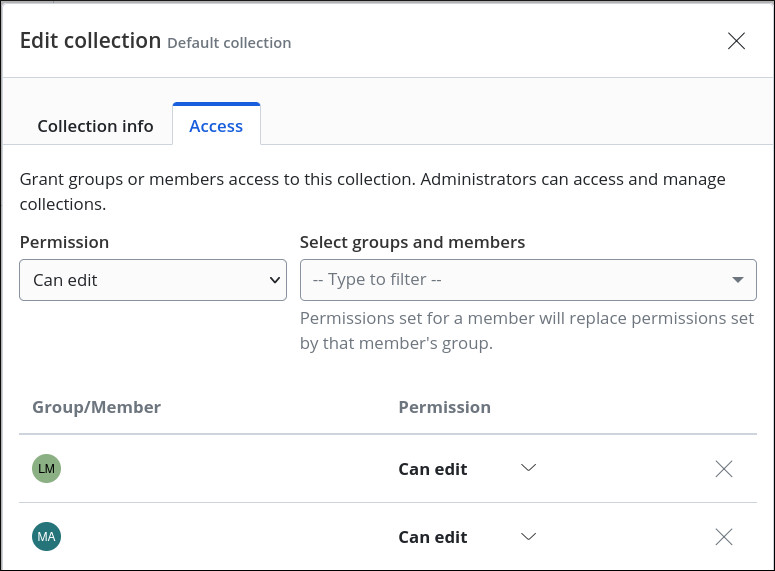
Now, your next step is to change your permissions for the “Finance” collection. I think the best way to do this would be to click the kebab icon to the right of the “Finance” collection (in the “Collections” section of the Admin Console) and choose “Edit Info”. In the pop-up, you should see a tab labeled “Access” (see screenshot). Use the to remove your username from the list of users who have access to the “Finance” collection.
Confirm that if you open the “Finance” collection while still in the Admin Console, you can still see the financial account credentials that are stored in the “Finance” collection.
Next, switch the the Password Manager section of the Web Vault (or launch any Bitwarden app or browser extension), and confirm that when you filter by “All Vaults”, the financial account credentials are nowhere to be seen.
Sorry about that. A little while back, there was a major rearrangement of the user interface for managing organizations and collections, so it seems that things have to be done a little differently now.
You have to first go to Settings > Organization Info (in the Admin Console), enable the option “Owners and admins can manage all collection and items”, and then click Save:
Web browser → Password Manager → Vaults → FILTERS → All vaults → only shows general credentials.
I tried assigning an item to collections and the Finance collections was not available; only Shared collections is available.
Would you be able to assist with the Sharing set up please?
First, you’ll need to invite your partner to become a member of your organization. Have them register for a Bitwarden account (on the same sever that you use for your account — whether bitwarden.com or bitwarden.eu), if they have not already done so. Then follow the steps described here to invite them to join your organization. When they receive your invitation, they should follow the instructions available here to accept the invitation. After this has been done, you must go back to the your Web Vault Admin Console and confirm the accepted invitation, as described here.
When done, please post a (redacted) screenshot of the Members section from your organization’s Admin Console. Also post a screenshot of what’s shown in the Collections section.
Thank you, that worked, although I had to create a new item in the Shared Collection, rather than Import from my general credentials.
The process is quite disjointed, although Bitwarden has provided plenty of documentation…may I be sold bold as to suggest a tldr; for quick and easy setups for the lay person?
For example: Share
Create an Organisation with a shared Collection to add shared Items and let invitee know before an invite email is on the way
1. invite
Web browser → Bitwarden → Admin Console → Members → Invite member (on same server bitwarden.com or bitwarden.eu) → Role tab → Email: enter email of member that matches their Bitwarden account → select User for view and adding permissions → Collections tab → Permission: Can view → Select collections: select Shared → select Save →
2. accept
Invited member receives an email from noreply@bitwarden.com: Bitwarden Join Organisation → select Join Organisation Now → Bitwarden login with invitee’s email address → Continue → invitee’s password → Log in with master password → message says Invitation accepted.
3. confirm
The inviter receives email to confirm member from noreply@bitwarden.com → select Confirm member → enter inviter Bitwarden email address → Continue → inviter’s password → Log in with master password → Admin Console → Members → All → accepted member → select kebab → select Confirm → verify the invitee’s fingerprint phrase with the invitee → select Confirm
Fingerprint phrase location:
Cli: bw get fingerprint me
Mobile app: Bitwarden → Settings → Account security → Account fingerprint Phrase
Web app: Bitwarden → Settings → My account
Finally, I need to setup Emergency Access. I have paid the once off fee, however both Invitees were confused and didn’t know what to do? I (I’m remotely located) need to see what they see, so I can walk them through.
It is possible to move items from your individual vault into the shared collection (as shown in this video), but it sounds like you already found an alternative solution.
The Emergency Access setup process is described in the Help Documentation. It basically follows a process of Invite → Accept → Confirm, much like the process for adding a member to an organization.
Below, I have provided a more detailed visual guide for what will be seen and done by the person to whom you are granting emergency access. The process will be simpler (fewer moving parts) if that person registers for a Bitwarden account first, before you grant them emergency access. When you add them as an emergency contact, make sure that you specify the exact email address that the person is using as their Bitwarden account username.
After you have completed the process of inviting someone to become an emergency access grantee, they will receive an email that looks like this:
if the person already has a Bitwarden account, they should click the Log in button on the bottom left. They will then be taken to the Web Vault login page, which looks like this:
At this point, they should log in to their Bitwarden account, by entering their email address, clicking Continue, entering their master password, clicking Log in with master password, and finally providing the 2FA when prompted.
When they have logged into their Web Vault, they will momentarily see a toast notification in the upper right corner of the webpage, with a confirmation message as shown below:
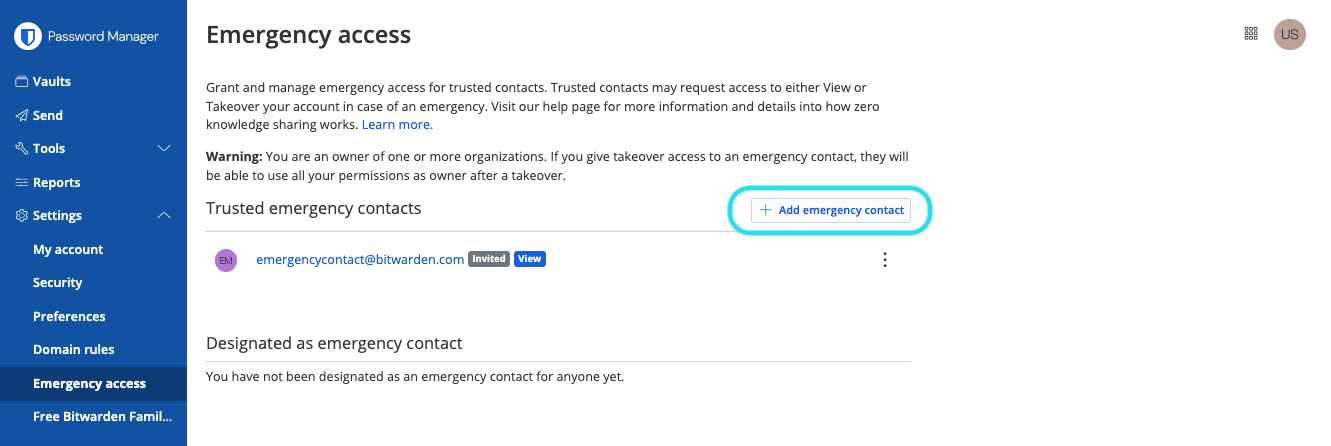
As the Emergency Access grantor, you will now need to go back to Settings > Emergency Access in your Web Vault, and proceed to confirm the invited person’s emergency access. When you have done so, the new emergency contact will receive a success email that looks like this:
Thank you.
Yes…the tech learners had some trouble finding how to request Emergency Access, which is in the kebab icon.
The email notifications could link to a webpage with easy image walkthrough would be handy.
They had to Zoom out on occasion as the phone hid the notification out of sight and showed a grey screen, causing confusion.
Alas, all now in order, thank you. Over and out


