For your Chipotle issues on mobile, please start a new thread, so that you can get help from someone familiar with Android.
OK, this is what we call “two-step login” or “two-factor authentication” (“2FA” for short). Set this up as follows:
Log in to the Bitwarden Web Vault (https://vault.bitwarden.com), and go to Settings > Security (using the left-hand navigation menu), then click the tab labeled “Two-Step Login”.
Before doing anything else, click View Recovery Code, enter your master password, and then carefully transcribe the displayed recovery code (32 characters) onto your Emergency Sheet. Close the pop-up when done. This recovery code can be used to disable all 2FA on your Bitwarden account in case something goes awry or you lose access to your 2FA.
I would also recommend creating a Password-Protected .Json export as a backup just before enabling 2FA, in case something goes wrong in the process of setting up 2FA.
Have your Yubikeys ready, but not yet plugged in. Next, click the Manage button for the “FIDO2 WebAuthn” option:
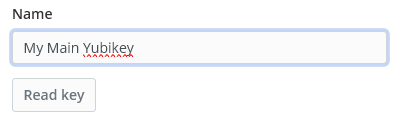
Enter your master password to proceed. Come up with a descriptive name to designate the first Yubikey (one that will let you know which of your Yubikeys to use), and enter this name into the “Name” field on the “Two-Step Login FIDO2 WebAuthn” form:
Next, plug in the designated key (the one that you just named) into your computer’s USB port, and click the Read Key button. This will trigger a number of prompts from the computer’s operating system; I forget if you have macOS or Windows or both, but in Windows 11, it will look something like the 6-step sequence shown below:

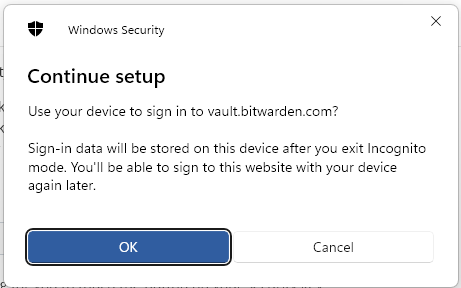
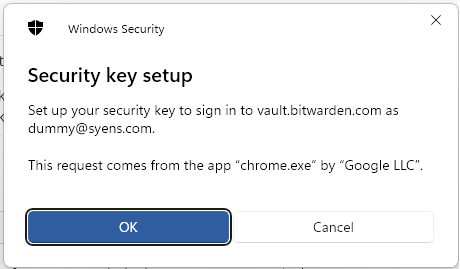
Click OK in the prompt above.

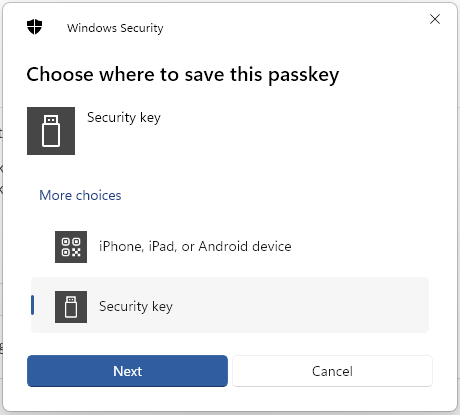
In the prompt above, set the selection to “Security key”, then click Next.

Click OK in the prompt above.

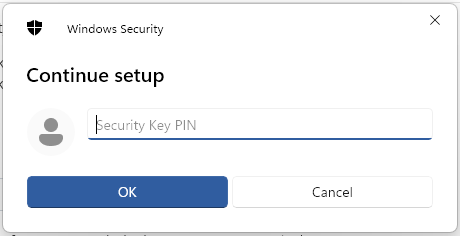
Enter your Yubikey PIN in the prompt above, then click OK. If you don’t have a Yubikey PIN, you may be prompted to create one (if you get stuck at this step, let me know). You should write your Yubikey PINs down on your Emergency Sheet.

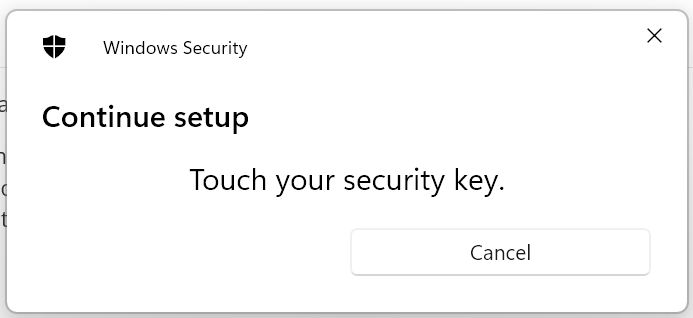
When you see the prompt above, touch the Yubikey.

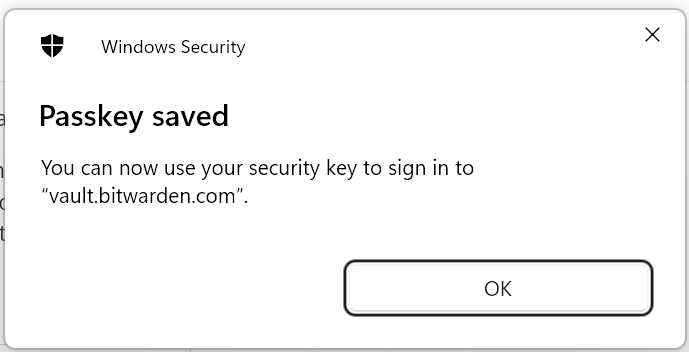
Click OK in the prompt above.
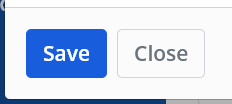
After working through the operating system’s prompts as shown above, you should now be back in the “Two-Step Login FIDO2 WebAuthn” form in the Bitwarden Web vault. Click the Save button in the bottom left corner of the form (as shown in the screenshot below).
You should now see the name that you had specified for this Yubikey shown in the list at the top of the form (replacing one of the placeholder names “WebAuthn Key 1”, etc.).
If you want to register additional Yubikeys, then pull out the previous Yubikey from the computer’s USB port, and start over from the step above where you specify the Yubikey “Name”.
When you are done registering (and saving) all of your Yubikeys, and verifying that their names are all listed at the top of the form, then click the Close button at the bottom of the form:

After double-checking that you have the Two-Step Login Recovery Code handy, log out of the Web Vault, and test logging back in.
You will now need to use your Yubikey as a second factor whenever you log in to your Bitwarden account using your username and master password (passphrase). If you want to exempt a device from this requirement, check the checkbox for the “Remember me” option before touching your Yubikey when you log in.